| LIFE OF A GT |
|
|
 | | January 15, 2010 - A long day with not much actual progress.
I managed to cut out a bracket. Oooo!
Actually, I did quite a bit more than that, mostly planning. I was following a pickup this morning and noticed that the shocks were mounted very far inboard. I realized that this would give more wheel travel for a given amount shock travel, and that I had previously considered a slightly more inboard mounting point on the MG. Obviously I wouldn't want to go too far, as my coilover setup would put some pretty major bending loads on the rear end and the lessened shock travel would mean less precise damping. But would it make much of a difference?
So I dragged the rear end back off the workbench were it was set up to have the shock bracket mounted on the driver's side, and stuck it back under the car. A bit of rough measuring showed that my alternate setup would give me an extra 1/4" to 3/8" of droop. Nothing to be ashamed of for such a simple change, and it would also give me more room in the wheel wells. It would also drop the lower mounting point of the shock down considerably, about 1.5" closer to the ground.
However, while doing my measuring, I discovered I'd mis-measured last time and I really had 2" of droop travel from my expected ride height. I suspect I hadn't let the shock fully extend, these AFCO shocks don't have internal pressurization so you have to actually pull them open. If the damping is cranked up, that takes a significant amount of effort. Regardless of the cause, it appears I have nothing to worry about so I'll continue as planned. The rear end came back out and was reinstalled on the workbench.
While poking around back there, I started looking at other packaging concerns - specifically, the available space for a muffler. There isn't much. The layout of the MGB GT's truck is a little weird, though. There's a fairly tall flat floor. If you lift it up, you discover a cavernous hole that exists to house the spare tire and quite possibly enough tools to disassemble the car. If I move the fuel tank into this space, that opens up a huge amount of room for a muffler underneath. I could either move the existing tank without too much trouble or build my own new one with some baffling inside. Mounting the filler is going to be a bit more of a problem as it would then be about level with the tank, but I have an idea.
More work!
entry 253 - tags: packaging, suspension, fuel tank | | | 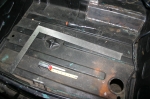 | February 20, 2010 - Before I can start fooling around with the exhaust, I need to confirm that the twin mufflers really will fit.
I'm almost positive they will, but it's time to move the gas tank. This is far less difficult than it sounds. The tank bolts to the bottom of the flat trunk floor. I simply had to drill a number of new holes 3" to the left of the existing ones. The large hole for the filler required a hole saw, but otherwise it was quick and easy work.
entry 293 - tags: fuel tank, packaging, exhaust | | | 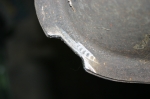 | February 20, 2010 - I did have to make one small alteration to the fuel tank.
This corner bumped up against my Panhard bar mount and kept me from getting the tank quite snuggled into position. A moment with the grinder solved that problem. You can see that the stock tank is actually crimped together. I was careful to stay clear of that section.
While I was goofing around underneath the car, I also removed the rear axle and relocated the lower shock mounting points an inch higher. This will give me a better bump/droop ratio for the suspension travel.
entry 294 - tags: axle, fuel tank | | | 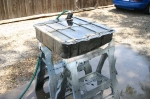 | May 22, 2012 - The car has been sitting for quite a while.
There have been a few reasons, but the biggest ones center around the fuel tank. Janel wasn't a big fan of the whole fireball escapade on the track for some reason. The fact that the car also stranded her on the side of the road on the way home didn't help.
Of course, we also took some time to run the Targa Newfoundland.
But it's time to get back at it. I really wanted to get a look inside this tank. So I yanked it out, filled it with water and used a Sawzall to cut the top off. The water was to force out any gasoline vapors, which could have caused extra excitement. It worked.
entry 635 - tags: fuel tank | | | 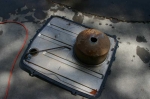 | May 22, 2012 - There was a big surprise waiting inside.
A BIG surprise. This giant canister. That's the top of the tank, upside down. The line running under the tank is the one that was originally attached to the charcoal canister. There's an itsy bitsy hole in the top of this canister, probably to prevent heat expansion from forcing fuel into the canister.
Great. But there are two problems with this. One was a big aftermarket dent in the bottom of my fuel tank. It kinda looked like someone had tried to jack the car up via the tank. This was perfectly placed to close off the hole in the bottom of the canister. You can see where it's been pressed up against the bottom of the tank.
The second problem is that I was using that charcoal canister fitting as my fuel return. I'm amazed any fuel got returned into the tank at all, and that's probably where my oddball fuel starvation problems came from.
This was quite a surprise.
entry 636 - tags: fuel tank | | | 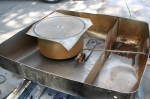 | May 22, 2012 - Here's a view on how the giant canister was placed in the tank.
You can see a couple of dents in this shot as well as the one baffle that was in place. It's to keep fuel from sloshing around and upsetting the fuel gauge, I assume.
But here's a neat trick. The fuel filler dumps into that right side section of the tank. And there's only one hole joining it to the rest of the tank. That hole doesn't go all the way to the bottom. So once you're down to a gallon or two, fuel doesn't transfer across. The fuel pickup is on the other side. So the pickup will continue to suck fuel out of the left side while the right continues to show fuel in the tank.
It's like MG wanted people to run out of fuel on the side of the road.
entry 637 - tags: fuel tank | | | 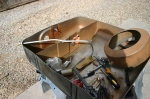 | May 22, 2012 - Time for some re-engineering.
The big canister has been repurposed - more on that later. I decided to move both the fuel pickup and return to the right front corner of the tank for better exhaust clearance. I used 3/8" and 5/16" brake line to form the lines, and kept the fuel pickup in the original location. I put a Miata "sock" on the pickup to replace the small MG one. Here I'm just starting to shape the pickup line.
The dents in the bottom have been hammered flat by this point.
entry 638 - tags: fuel tank | | | 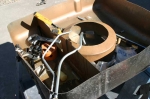 | May 22, 2012 - The lines have been shaped.
The big canister is now a big round baffle. There are some angled flaps on the bottom to make it easy for fuel to run in but a bit more challenging for it to run out. The return line also dumps into the canister to ensure it's got fuel in it. The lines take two different routes to avoid the float for the fuel gauge.
I'm not really planning on spending much time on the track with this car, but I couldn't resist making it better.
entry 639 - tags: fuel tank | | | 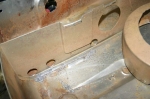 | May 22, 2012 - To avoid the problem of the baffle segregating the tank into have and have not sections, I drilled a few holes.
They won't allow rapid flow of fuel from one side to the other, but it will be enough to let me use the full tank capacity. Between this and removing the giant sealed off canister, I've probably doubled my tank capacity.
Once this was done, I cleaned out the tank and started welding. First, the big round baffle was tacked into place. Then the fuel lines were welded in. The original fuel pickup was welded shut. And finally, the fun job of welding the top back on again. I used a MIG welder for this which does usually leave some pinholes, but I did my best to get a good seal. I also spread some gasoline-resistant liquid metal over the seam to catch any little leaks. The seam is right at the top of the tank so it's unlikely to ever be wet on the inside, but I still don't want any leaks!
entry 640 - tags: fuel tank | | | 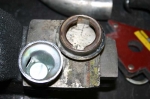 | May 22, 2012 - With the tank back in, it's time to sort out the spitting fuel problem.
That's what led to the fireball at the track. I probably should have put some baffling inside the filler neck to avoid any splashes, but instead I decided to borrow yet another Miata part.
The filler on a Miata has a spring-loaded flap in it. Perfect. I cut one out of a Miata filler and welded it into the MG neck, just below the cap. There are two small vents on each side that act as drains and a place for air to escape when you're filling up. They're usually attached to a separate pipe, but I decided to just let them go into the main filler neck. There's a small chance of some splashing through them, but it's going to take some real effort to make that happen. I think it'll be a decent solution, and it's invisible.
As an added bonus, the MG now looks like a modern car that drinks unleaded when you unscrew the fuel cap.
entry 641 - tags: fuel tank | | |
|

 THE DIARY